
Using Swift in AWS Lambda to Display CI Build Badges
During the last month, as part of my work as an iOS Infra engineer at Houzz, I was responsible for moving our CI from a in-house, bare metal setup running TeamCity, to Bitrise. The constant maintenance, hardware limitations, and lack of determinism were the main reasons for this change.
Connected to the single repository containing the code for both Consumer and Pro apps, we have 6 types of builds: On commit, Nightly, and Release, for both apps. One of the advantages of the TeamCity approach when compared to Bitrise, is that it provides a way to see the status of these 6 builds, while Bitrise displays the builds sorted by time. When I realized we lost this quick and useful overview, I wanted to build something to replace it.
Initially, I thought of building a web dashboard based on the Bitrise API. Or, possibly, storing the statuses at some server and updating it at the end of every build. But I quickly disregarded it. Requiring our devs to go to another page (specially now that everyone is remote, and displaying it in a TV in the office is not an option) and managing static pages or servers were factors that made me walk way from this idea. Then I thought about displaying a table with the existing and popular build badges, provided by many CI/CD solutions. Throw them in the repository’s Readme in GitHub, and that’s it!
Bitrise provides status images, so I thought there would be almost no work: just embed the images in the readme, and that’s it. Shortly after, I realized their Badge API is missing something basic: although it supports querying per branch statuses, it doesn’t for workflow IDs. As the different builds run per workflow, I couldn’t go with this solution.
Embedding images in markdown do not support any logic, as they’re simple GET requests. I realized I would need some sort of logic running in a remote server: use the broader Bitrise API, analyze the response, and return an image, or maybe a redirect to Shields.io with the correct parameters.
Being able to run code in the cloud on demand seemed the perfect fit for my goal. Instead of managing servers, scaling and loading, many cloud providers do that for you by allocating the hardware resources which will execute your code only when it’s necessary. They take care of the servers running your code, so the industry calls this model serverless. AWS sells it as Lambda, Google Cloud and Azure simply call it Serverless, and even Cloudflare allows having serverless function with their Workers product.
The Swift Lambda Runtime
Although I’ve used Lambda in the past for executing Javascript, I wanted to try the Swift implementation of the AWS Lambda Runtime, released a few months ago by the Swift Server Work Group. Besides the runtimes provided by default by AWS (as Node.js, Python, Ruby, Java and Go), one can implement custom runtimes which run on Amazon Linux. Some people have been working on supporting Swift on Lambda for a long time, but finally we have now an official package by the Swift Server group.
To get started, you can watch this WWDC20 session by Tom Doron, and also read this post and this post by Fabian Fett, which describes some of the prerequisites, such as installing Docker, setting up an AWS account, and exposing your lambda to HTTP endpoint using API Gateway. Both Tom and Fabian work at Apple and maintain the Swift Lambda Runtime package.
If you’re an iOS developer, writing some Lambda functions might be the fastest way to get something up and running to provide remote APIs for your apps. Or, maybe, if you work for a company that has both Android and iOS products, moving some of the code to the cloud might save you from writing parsing logic twice in your app clients.
Note: this post will focus more on the implementation of the function itself to achieve my goal, rather than on how to deploy lambda functions. You can refer to Fabian’s post linked above if you want to learn how to deploy your Lambda function and connecting it to API Gateway. Lambda and API Gateway are two different services, which can be used together.
First Try: Redirecting to Shields.io
My first idea was to read the Bitrise API, querying for a specific workflow ID, and returning a redirect in the lambda response to Shields.io. This is a service that provides badges which can be included in Readmes and other pages. Alongside with ready badges for different services (which do the logic for you), it also allows you creating static badges, without any logic, based on parameters you provide. For example, copy https://img.shields.io/badge/TestBadge-works-green and paste it into the address bar in your browser.
To perform a redirect using the Swift runtime, you can write something like this:
import Foundation
import AWSLambdaRuntime
import AWSLambdaEvents

Lambda.run { (context, request: APIGateway.V2.Request, callback: @escaping (Result<APIGateway.V2.Response, Error>) -> Void) in
    let headers = ["Location": "https://img.shields.io/badge/Redirect-Succeeded-orange"]
	return callback(.success(.init(statusCode: .found, headers: headers)))
}
If you use curl -i to call the /invoke path on localhost, you’ll get the following response:
HTTP/1.1 200 OK
content-length: 102

{"headers":{"Location":"https:\/\/img.shields.io\/badge\/Redirect-Succeeded-orange"},"statusCode":302}
Notice how the /invoke function returns 200 OK, while the body contains what API Gateway needs. API Gateway will convert the status code and the body into another response. After you deploy the same function, you should integrate the it via API Gateway, and calling it with curl -i will result in the following response:
HTTP/2 302
date: Fri, 15 Jan 2021 13:06:29 GMT
content-length: 0
location: https://img.shields.io/badge/Redirect-Succeeded-orange
Notice how now the status code is 302, found, which is used for redirecting. If you call the same API from the browser, it will handle the redirect for you. So far so good.
Once you get this working, adding a method for querying the Bitrise API is straightforward. A single URLRequest call using URLSession is enough:
import Foundation
import AWSLambdaRuntime
import AWSLambdaEvents

//1
#if canImport(FoundationNetworking)
import FoundationNetworking
#endif

//2
struct ErrorResponse: Codable {
	let error: String
}

//3
guard
	let appSlug = Lambda.env("APP_SLUG"),
	let bitriseToken = Lambda.env("BITRISE_TOKEN") else {
	fatalError("Environment variables not configured")
}

Lambda.run { (context, request: APIGateway.V2.Request, callback: @escaping (Result<APIGateway.V2.Response, Error>) -> Void) in
	//4
	guard let workflowId = request.queryStringParameters?["workflow_id"] else {
		let error = try? JSONEncoder().encodeAsString(ErrorResponse(error: "Missing required workflow_id parameter"))
		return callback(.success(.init(statusCode: .badRequest, body: error)))
	}

	//5
	let urlString = "https://api.bitrise.io/v0.1/apps/\(appSlug)/builds?sort_by=created_at&workflow=\(workflowId)&limit=10"
	let url = URL(string: urlString)!
	var urlRequest = URLRequest(url: url)
	urlRequest.setValue(bitriseToken, forHTTPHeaderField: "Authorization")

	URLSession.shared.dataTask(with: urlRequest) { data, response, error in
		guard
			let data = data,
			error == nil,
			let buildResponse = try? jsonDecoder.decode(BuildsResponse.self, from: data) else {
			return callback(.success(.init(statusCode: .badRequest)))
		}

		guard let build = buildResponse.builds.first(where: { [1, 2, 3, 4].contains($0.status) }) else {
			let error = try? JSONEncoder().encodeAsString(ErrorResponse(error: "Build  \(workflowId) not found"))
			return callback(.success(.init(statusCode: .badRequest, body: error)))
		}

		//6
		let location: String
		if build.status.contains("success") {
			location = "https://img.shields.io/badge/\(workflowId)-Passing-green"
		} else {
			location = "https://img.shields.io/badge/\(workflowId)-Failing-red"
		}

		let headers = ["Location": location]
		return callback(.success(.init(statusCode: .found, headers: headers)))
	}.resume()
}
Notice a few things were added in this sample code:
- On Linux,
URLSessionis part ofFoundationNetworking, and notFoundationas on iOS and macOS. ErrorResponseis aCodablestruct that wraps an error string. Because the API Gateway expects thebodyparameter as a String, aencodeAsStringextension method is used onJSONEncoder, as described by Fabian in the Step 4: JSON section.- The package provides a static function
env(_ name: String) -> String?, which is ideal for accessing environment variables as API tokens and other sensitive parameters. Without these required values, afatalErroris thrown and the Lambda cannot be initialized. - You can access the query string parameters of the URL with the
queryStringParametersproperty ofAPIGateway.V2.Request. If noworkflow_idis provided, the function returns with a bad request 400 response. - Create the Bitrise API request, using the app slug defined in step 3, and workflow id from the previous step. Don’t forget to also set the HTTP header field
Authorizationusing the Bitrise API token, also defined in step 3. - Finally, after processing the status of the latest build for a given workflow ID, decide what Shields.io URL to redirect to.
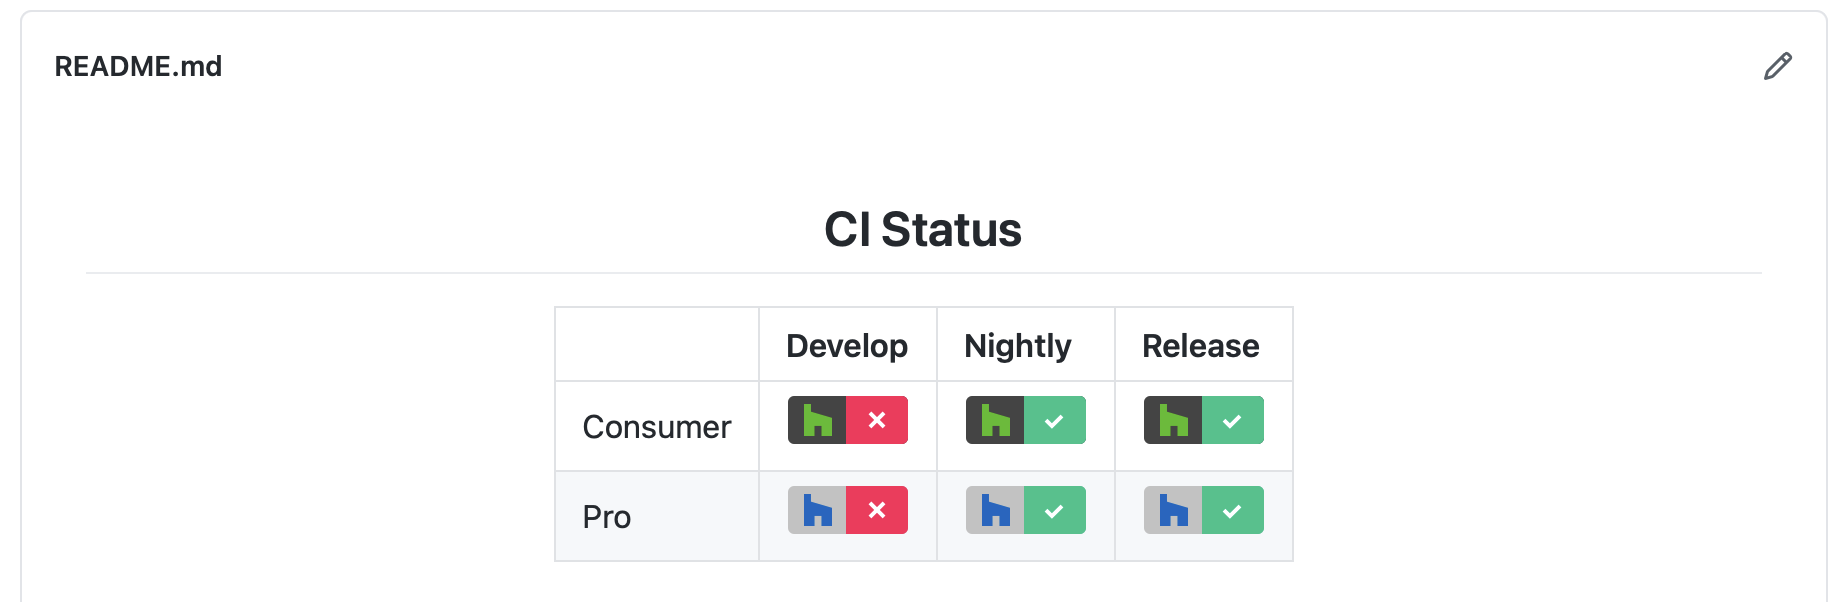
Once I deployed this function, I got exactly what I wanted. A URL for a badge with the correct status.
After embedding the image URLs with each workflow as a parameter (for example, https://<API-GATEWAY-ID>.execute-api.us-east-1.amazonaws.com/badge?workflow_id=Consumer-OnCommit), I started seeing the badges I wanted. I saw which builds were failing, and after fixing them, I was expecting to see them changing. Except they didn’t: by inspecting the HTML of the GitHub Readme, I noticed that all images had a different URL. Something in the form of http://camo.githubusercontent.com/<Some-Long-ID>.... After a short research, it turned out that GitHub proxies and caches every media in the Readme, which is bad for build badges that constantly might change.
As stated in the GitHub docs, setting the Cache-Control header to no-cache in the response should be enough to avoid caching. However, as my function’s URL only performed a redirect, and static Shields.io badges have max-age=86400 in their Cache-Control header, doing so didn’t help in the end.
I realized I would need to return my own images instead of relying on a redirect to a server I don’t control.
Returning Binary Data with Lambda and API Gateway
The process to return the build badge as an image data would consist creating the images and figuring out what type of response I needed to provide API Gateway with. The first part was relatively easy: figuring out the best colors and shapes in Sketch.

After exporting them, I searched the correct way of returning binary data from a Lambda function with API Gateway. It turns out the data needs to be converted into a Base64 encoded string, and this string passed as the body parameter. Additionally, the key isBase64Encoded needs to be set to true, and API Gateway takes care of converting it from Base64 to binary. To make GitHub load the image correctly, the header Content-Type should be set to image/png or another valid content type.
Because the images are small, and are only 4 in total, I decided to embed them as plain string variables into the code. I used an Xcode playground importing UIKit to convert a UIImage from resources into Base64. I copied the results from the playground console into something like this:
let consumerPassing = "iVBORw0KGgoAAAANSUhEUgA..." //a long string
let proPassing = //similar
let consumerFailing = //similar
let proPassing = //similar
Once the strings were ready, it was it was left to find the correct image and wrap it in the response:
//decide the image based on the build response and workflow id
let base64Image = build.statusText == "success" ? consumerPassing : consumerFailing

let headers = ["Cache-Control": "no-cache", "Content-Type": "image/png"]
let response = APIGateway.V2.Response(statusCode: .ok, headers: headers, body: base64Image, isBase64Encoded: true)
return callback(.success(response))
With the code above deployed, calling my Lambda function returned an image which could be embedded in the Readme:
Bonus Points: Linking to the Build Page
After the mini dashboard was live, I had another idea, which could be the cherry on top. What if clicking the badges would take the developer straight to the page of the build. This could save them from searching the build in the list of builds. And after all, by using the Bitrise API, I had all the information I needed.
One of the advantages of using API Gateway, is that you can integrate your lambda with many routes. For example, you can have <Url-Host>/badge and <Url-Host>/link using the same lambda, and deal with the routing on the lambda itself. This is exactly what I did.
On the API Gateway dashboard, I added two GET routes: one for /badge, and another one for /link. Under Integrations, I connected both routes to my lambda function, and inside my function, instead of returning the image right away, I did the following:
Lambda.run { // ...
	//decode workflow_id...

	URLSession.shared.dataTask(with: urlRequest) { data, response, error in
		//decode build data...

		switch request.context.http.path {
		case "/badge":
			retrieveImage(for: build, workflowId: workflowId, callback: callback)
		case "/link":
			redirect(to: build.slug, callback: callback)
		default:
			let error = try? JSONEncoder().encodeAsString(ErrorResponse(error: "Invalid path: \(request.context.http.path)"))
			return callback(.success(.init(statusCode: .notFound, body: error)))
		}
	}
}
Below that, I inserted the two functions called from the switch statement:
func redirect(to buildSlug: String, callback: @escaping (Result<APIGateway.V2.Response, Error>) -> Void) {
	let headers = ["Cache-Control": "no-cache", "Location": "https://app.bitrise.io/build/\(buildSlug)"]
	return callback(.success(.init(statusCode: .found, headers: headers)))
}

func retrieveImage(for build: Build, workflowId: String, callback: @escaping (Result<APIGateway.V2.Response, Error>) -> Void) {
	//move here the response initialization based on the correct image for `build`
}
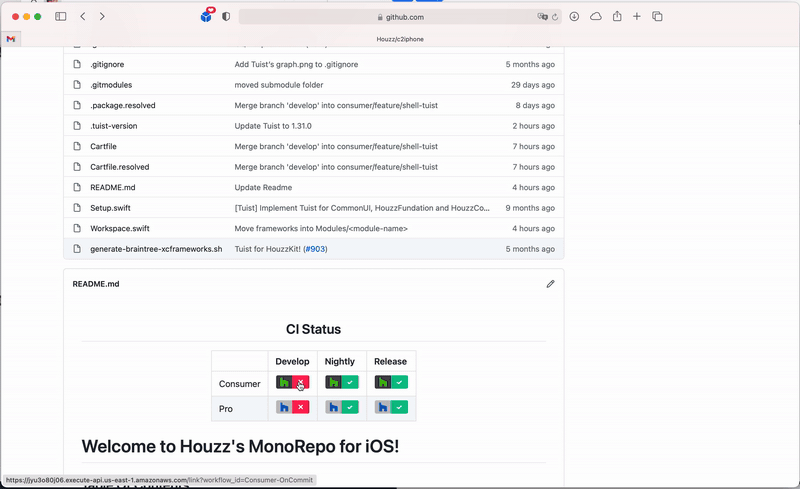
After deploying the code above, and inserting the link URL for each image with the correct workflow ID, taking the user to the failing or passing build worked perfectly:
In a Paragraph
AWS Lambda is a great (and probably cheap) resource for running specific computational tasks. With the official runtime package, Swift is a fantastic language to write your lambdas with. Be it due to its low memory foot, type safety, and also for being a language you might be familiar with already. With API Gateway you can expose your functions to the web and call them from anywhere (app client, readme), and don’t worry about server scaling and uptime.